Jester v2 Wheel Menu Structure
0. Root Menu
Opening the Jester menu brings up this new layout:
- Press 1: RADIO
- Press 2: AIR TO AIR RADAR
- Press 3: TID & WCS RADAR
- Press 4: AIR TO GROUND WEAPONS
- Press 5: NAVIGATION UTILITY
- Press 6: CMS & RWR DEFENSIVE
- Press 7: TACTICAL IMAGING SET UTILITY
- Press 8: CREW CONTRACT UTILITY
1. Radio Main Menu
Path: [Jester Menu] -> Press 1
- Press 1: AN/ARC-182 (Comm Radio)
- Press 2: DATA LINK
1.1. AN/ARC-182 (Comm Radio)
Path: [Jester Menu] -> Press 1 -> Press 1
- Press 1: USE GUARD (243.000)
- Press 2: USE MANUAL
- Press 3: USE CHANNEL
- Press 4: TUNE MANUAL
- Press 5: SELECT CHANNEL
- Press 6: SELECT MODE
- Press 7: TUNE ATC
- Press 8: TUNE TAC
1.1.5. Select Channel
Path: [Jester Menu] -> Press 1 -> Press 1 -> Press 5
- Press 1: PREV CHANNEL
- Press 2: NEXT CHANNEL
- Press 3: CHANNELS 1-5
- Press 4: CHANNELS 6-10
- Press 5: CHANNELS 11-15
- Press 6: CHANNELS 16-20
- Press 7: CHANNELS 21-25
- Press 8: CHANNELS 26-30
1.1.5.3. Channels 1-5
Path: [Jester Menu] -> Press 1 -> Press 1 -> Press 5 -> Press 3
- Presss 1-5: CH 1 to CH 5
1.1.5.4. Channels 6-10
Path: [Jester Menu] -> Press 1 -> Press 1 -> Press 5 -> Press 4
- Presss 1-5: CH 6 to CH 10
1.1.5.5. Channels 11-15
Path: [Jester Menu] -> Press 1 -> Press 1 -> Press 5 -> Press 5
- Presss 1-5: CH 11 to CH 15
1.1.5.6. Channels 16-20
Path: [Jester Menu] -> Press 1 -> Press 1 -> Press 5 -> Press 6
- Presss 1-5: CH 16 to CH 20
1.1.5.7. Channels 21-25
Path: [Jester Menu] -> Press 1 -> Press 1 -> Press 5 -> Press 7
- Presss 1-5: CH 21 to CH 25
1.1.5.8. Channels 26-30
Path: [Jester Menu] -> Press 1 -> Press 1 -> Press 5 -> Press 8
- Presss 1-5: CH 26 to CH 30
1.1.6. Select Mode
Path: [Jester Menu] -> Press 1 -> Press 1 -> Press 6
- Press 1: MODE OFF
- Press 2: MODE TR
- Press 3: MODE TR/G
- Press 4: MODE DF
- Press 5: MODE TEST
- Press 6: MODULATION MAN FM
1.2. Data Link Main Menu
Path: [Jester Menu] -> Press 1 -> Press 2
- Press 1: SET MODE
- Press 2: SET FREQUENCY PRESET
- Press 3: SET HOST
1.2.1. Set Mode
Path: [Jester Menu] -> Press 1 -> Press 2 -> Press 1
- Press 1: TACTICAL DATALINK SYSTEM (TADIL-C / Link 4A)
- Press 2: FIGHTER-TO-FIGHTER
- Press 3: OFF
1.2.2. Set Frequency Preset
Path: [Jester Menu] -> Press 1 -> Press 2 -> Press 2
- Press 1: 300.00MHZ (AI F2F)
- Press 2: 300.10MHZ
- Press 3: 300.20MHZ
- Press 4: 300.30MHZ
- Press 5: 300.40MHZ
- Press 6: 300.50MHZ
- Press 7: 300.60MHZ
- Press 8: 300.70MHZ
1.2.3. Set Host
Path: [Jester Menu] -> Press 1 -> Press 2 -> Press 3
- Press 1-8: Dynamic list of AWACS (e.g., OVERLORD 1-1) or Aircraft Carriers in the mission.
2. Air to Air Radar Main Menu
Path: [Jester Menu] -> Press 2
- Press 1: BEYOND VISUAL RANGE
- Press 2: WITHIN VISUAL RANGE
2.1. Beyond Visual Range
Path: [Jester Menu] -> Press 2 -> Press 1
[!WARNING] The Beyond Visual Range menu dynamically shifts its Presss depending on whether the radar is ACTIVE or SILENT. When you command Jester to "Go Silent", the "STT Lock" Press disappears (since it requires an emitting radar), and all other Presss shift up by one slot. This means your macro paths will change depending on the radar state!
State A: Radar is ACTIVE (Default)
- Press 1: STT LOCK
- Press 2: SCAN ELEVATION
- Press 3: SCAN AZIMUTH
- Press 4: TID RANGE
- Press 5: RADAR SETTINGS
- Press 6: WITHIN VISUAL RANGE (Returns to WVR menu)
- Press 7: GO SILENT (Switches to State B)
- Press 8: IFF
State B: Radar is SILENT
- Press 1: SCAN ELEVATION
- Press 2: SCAN AZIMUTH
- Press 3: TID RANGE
- Press 4: RADAR SETTINGS
- Press 5: WITHIN VISUAL RANGE (Returns to WVR menu)
- Press 6: GO ACTIVE (Switches back to State A)
- Press 7: IFF
(Note: The submenu paths below are documented based on the default ACTIVE state. If the radar is silent, subtract 1 from the final Press press for all menus except STT Lock).
2.1.1. STT Lock
Path: [Jester Menu] -> Press 2 -> Press 1 -> Press 1
- Press 1: TARGET AHEAD
- Press 2: ENEMY TARGET AHEAD
- Press 3: FRIENDLY TARGET AHEAD
- Press 4: CHOOSE SPECIFIC TARGET
- Press 5: FIRST TWS TARGET
- Press 6: TWS TARGET NUMBER
2.1.2. Scan Elevation
Path: [Jester Menu] -> Press 2 -> Press 1 -> Press 2
- Press 1: AUTO EL AND AZ
- Press 2: 15 NM
- Press 3: 20 NM
- Press 4: 30 NM
- Press 5: 40 NM
- Press 6: 50 NM
- Press 7: 75 NM
- Press 8: 100 NM
2.1.3. Scan Azimuth
Path: [Jester Menu] -> Press 2 -> Press 1 -> Press 3
- Press 1: CENTER
- Press 2: RIGHT 20
- Press 3: RIGHT 40
- Press 4: RIGHT 55
- Press 5: AUTO EL AND AZ
- Press 6: LEFT 55
- Press 7: LEFT 40
- Press 8: LEFT 20
2.1.4. TID Range
Path: [Jester Menu] -> Press 2 -> Press 1 -> Press 4
- Press 1: AUTO
- Press 2: 25 NM
- Press 3: 50 NM
- Press 4: 100 NM
- Press 5: 200 NM
- Press 6: 400 NM
2.1.5. Radar Settings
Path: [Jester Menu] -> Press 2 -> Press 1 -> Press 5
- Press 1: AUTO
- Press 2: TRACK WHILE SCAN AUTO
- Press 3: TRACK WHILE SCAN MANUAL
- Press 4: RANGE WHILE SEARCH
- Press 5: TARGET SIZE SWITCH
- Press 6: TARGET ASPECT SWITCH
2.1.5.5. Target Size Switch
Path: [Jester Menu] -> Press 2 -> Press 1 -> Press 5 -> Press 5
- Press 1: NORMAL
- Press 2: LARGE
- Press 3: SMALL
2.1.8. IFF
Path: [Jester Menu] -> Press 2 -> Press 1 -> Press 8
- Press 1: INTERROGATOR MODE
- Press 2: MASTER MODE
- Press 3: TRANSPONDER MODES
- Press 4: M3 CODE
- Press 5: M1 CODE
2.1.8.1. Interrogator Mode
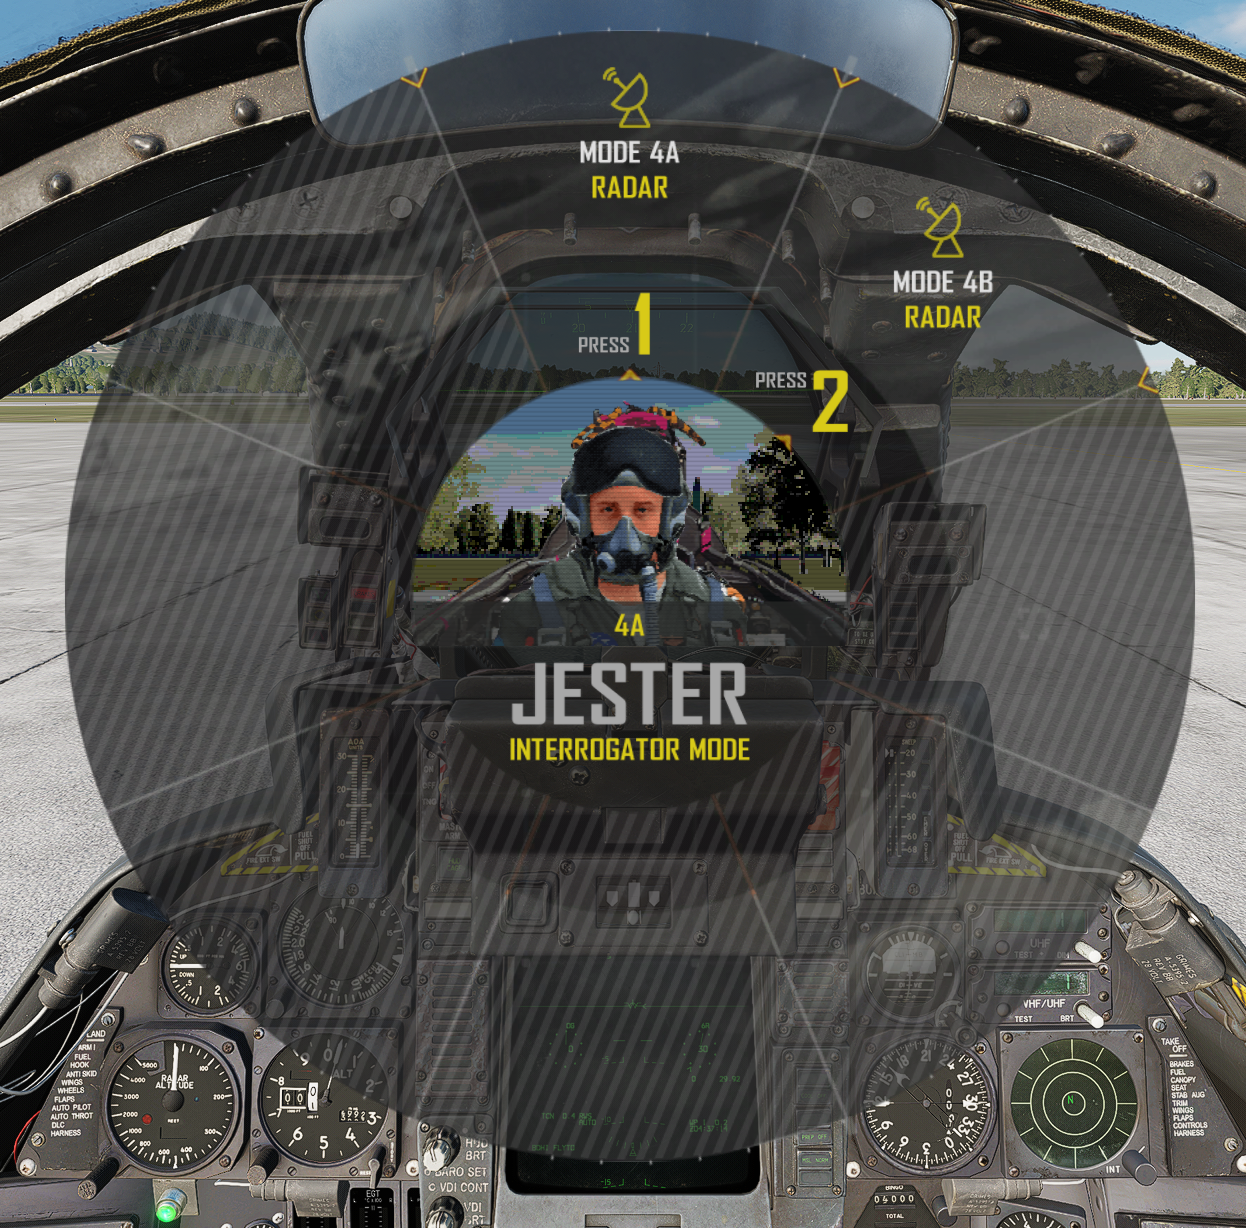
Path: [Jester Menu] -> Press 2 -> Press 1 -> Press 8 -> Press 1
- Press 1: MODE 4A
- Press 2: MODE 4B
2.1.8.2. Master Mode
Path: [Jester Menu] -> Press 2 -> Press 1 -> Press 8 -> Press 2
- Press 1: OFF
- Press 2: STBY
- Press 3: LOW
- Press 4: NORM
- Press 5: EMER
2.1.8.3. Transponder Modes
Path: [Jester Menu] -> Press 2 -> Press 1 -> Press 8 -> Press 3
- Press 1: M1
- Press 2: M2
- Press 3: M3A
- Press 4: MC
- Press 5: M4
2.2. Within Visual Range
Path: [Jester Menu] -> Press 2 -> Press 2
- Press 1: CANCEL HOT RWS
- Press 2: JETTISON DROP TANKS
- Press 3: BEYOND VISUAL RANGE (Returns to BVR menu)
3. TID & WCS Radar Main Menu
Path: [Jester Menu] -> Press 3
[!NOTE] Presss 1, 2, and 4 in this menu dynamically toggle their text labels based on their current active state.
- Press 1: EXPAND TID / COLLAPSE TID (Toggle)
- Press 2: ENABLE AUTO EXPAND / DISABLE AUTO EXPAND (Toggle)
- Press 3: TID RANGE (Leads to same submenu as 2.1.4. TID Range)
- Press 4: TID GROUND STABILIZE / TID AIRCRAFT STABILIZE (See 3.4 below)
- Press 5: RADAR SETTINGS (Leads to same submenu as 2.1.5. Radar Settings)
3.4. TID Ground Stabilize
Path: [Jester Menu] -> Press 3 -> Press 4
(Note: This submenu only opens if Press 4 says "TID GROUND STABILIZE". If the menu currently says "TID AIRCRAFT STABILIZE", clicking Press 4 will instantly toggle it back to the default state without opening a submenu).
- Press 1: 15 S
- Press 2: 30 S
- Press 3: 60 S
- Press 4: 120 S
- Press 5: INDEFINITE
5. Navigation Utility Main Menu
Path: [Jester Menu] -> Press 5
- Press 1: STEERING MODE
- Press 2: SEQUENCING
- Press 3: BDHI STEERING
- Press 4: SELECT DESTINATION WAYPOINT
- Press 5: DIRECT-TO WAYPOINT
- Press 6: SELECT SURFACE TARGET WAYPOINT
- Press 7: FLIGHT PLAN
- Press 8: BULLSEYE / NAV GRID (Toggle)
5.1. Steering Mode
Path: [Jester Menu] -> Press 5 -> Press 1
- Press 1: EGI FLY-TO
- Press 2: DESTINATION
5.2. Sequencing
Path: [Jester Menu] -> Press 5 -> Press 2
- Press 1: AUTO
- Press 2: OVERFLY
- Press 3: MANUAL
5.3. BDHI Steering
Path: [Jester Menu] -> Press 5 -> Press 3
- Press 1: FLY-TO
- Press 2: FP WAYPOINT (Opens Select BDHI Waypoint menu)
- Press 5: HUD SYNC
5.3.2. Select BDHI Waypoint
Path: [Jester Menu] -> Press 5 -> Press 3 -> Press 2
- Presss 1-8: Dynamic list of waypoints (e.g., 01 DEST PRI01, 02 AUTO HB HB, 03 AUTO BE BULLSEYE)
5.4. Select Destination Waypoint
Path: [Jester Menu] -> Press 5 -> Press 4
- Presss 1-8: Dynamic list of waypoints (e.g., 01 DEST PRI01, 02 AUTO HB HB, 03 AUTO BE BULLSEYE)
5.5. Direct-To Waypoint
Path: [Jester Menu] -> Press 5 -> Press 5
- Presss 1-8: Dynamic list of waypoints (e.g., 01 DEST PRI01, 02 AUTO HB HB, 03 AUTO BE BULLSEYE)
5.6. Select Surface Target Waypoint
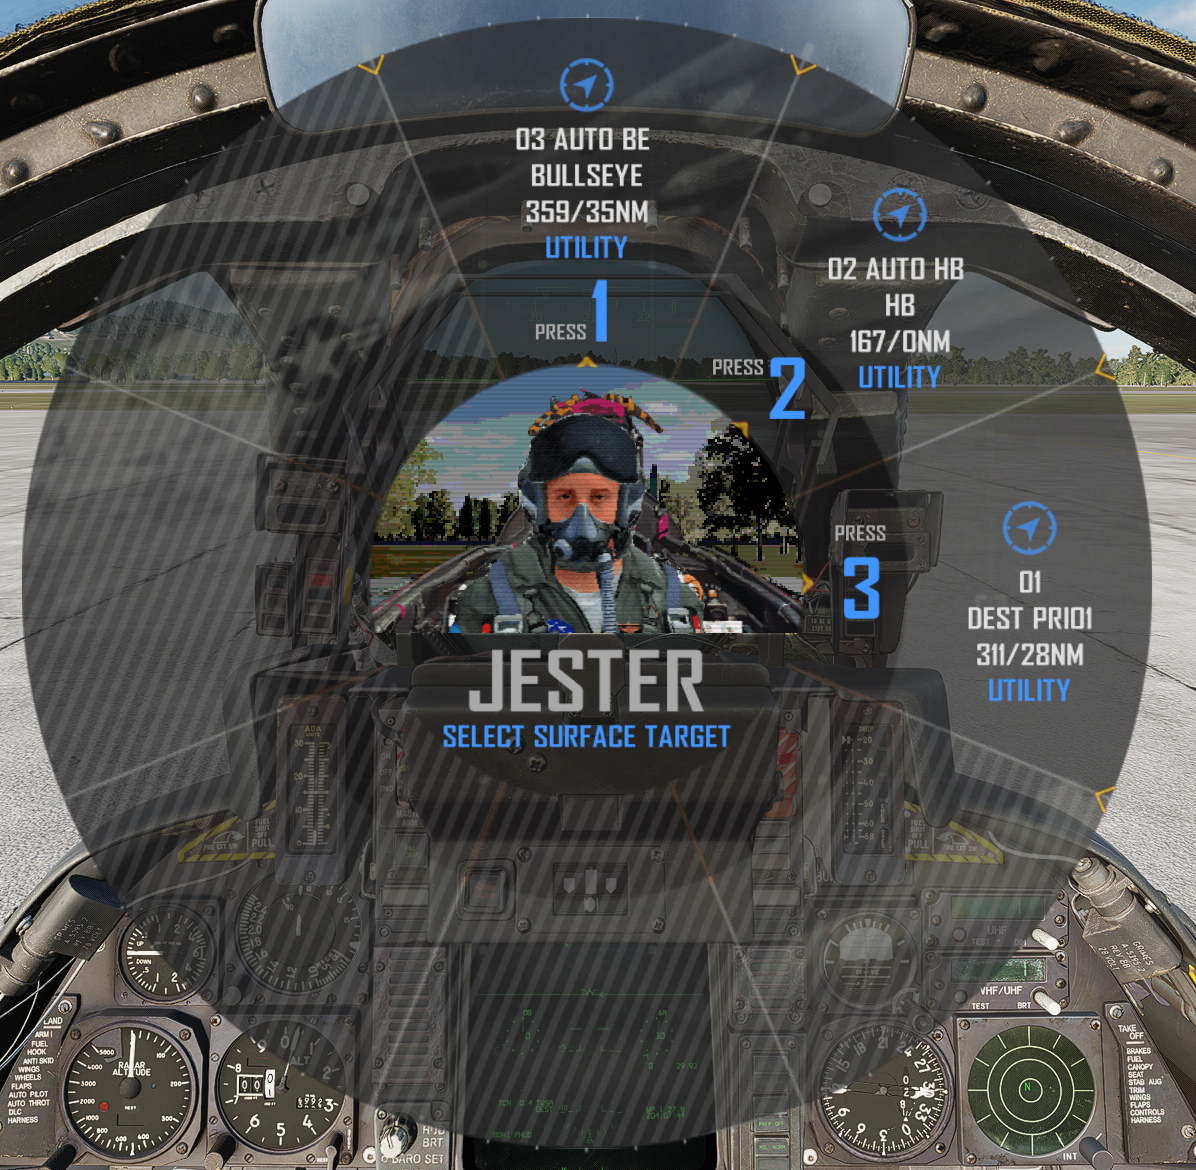
Path: [Jester Menu] -> Press 5 -> Press 6
- Presss 1-8: Dynamic list of waypoints (e.g., 01 DEST PRI01, 02 AUTO HB HB, 03 AUTO BE BULLSEYE)
5.7. Flight Plan
Path: [Jester Menu] -> Press 5 -> Press 7
- Press 1: LOAD FLIGHT PLAN
- Press 2: RELOAD CURRENT FLIGHT PLAN
- Press 3: MANUAL ENTER WAYPOINT (L/L)
- Press 4: MANUAL ENTER WAYPOINT (MGRS)
- Press 5: WAYPOINT FROM MAP
6. CMS & RWR Defensive Main Menu
Path: [Jester Menu] -> Press 6
- Press 1: CMDS MODE
- Press 2: MANUAL PROGRAM
- Press 3: INHIBITS
- Press 5: RWR DISPLAY TYPE
- Press 6: SET JAMMER XMIT
6.1. CMDS Mode
Path: [Jester Menu] -> Press 6 -> Press 1
- Press 1: OFF
- Press 2: STANDBY
- Press 3: MANUAL
- Press 4: SEMI
- Press 5: AUTO
- Press 6: BYPASS
6.2. Manual Program
Path: [Jester Menu] -> Press 6 -> Press 2
- Press 1: PRG 1
- Press 2: PRG 2
- Press 3: PRG 3
- Press 4: PRG 4
6.3. Inhibits
Path: [Jester Menu] -> Press 6 -> Press 3
- Press 1: INHIBIT CHAFF
- Press 2: INHIBIT FLARE
- Press 3: INHIBIT 01
- Press 4: INHIBIT 02
- Press 5: INHIBIT RWR
- Press 6: INHIBIT MWS
- Press 7: INHIBIT JAMMER
6.5. RWR Display Type
Path: [Jester Menu] -> Press 6 -> Press 5
- Press 1: NORMAL
- Press 2: AIRBORNE INTERCEPTOR
- Press 3: AAA
- Press 4: UNKNOWN
- Press 5: FRIENDLY
7. Tactical Imaging Set Utility Main Menu
Path: [Jester Menu] -> Press 7
- Press 1: TURN OFF
- Press 2: SOURCE: [CURRENT] (Opens Recording Source menu)
- Press 3: START RECORDING
- Press 4: SNAP
- Press 5: SEND
7.2. Recording Source
Path: [Jester Menu] -> Press 7 -> Press 2
- Press 1: PILOT
- Press 2: RIO
- Press 3: RASTER
8. Crew Contract Utility Main Menu
Path: [Jester Menu] -> Press 8
- Press 1: SET INACTIVE (Toggle)
- Press 2: SET NO TALKING (Toggle)
- Press 3: SET EJECT BOTH (Toggle)
- Press 4: DISABLE LANDING CALLOUTS (Toggle)
- Press 5: ENABLE AUTO EXPAND (Toggle)
- Press 6: DISABLE AUTO VID (Toggle)
- Press 7: TREAT NO-REPLY AS BANDIT (Toggle)